
Click on image to enlarge.
Sections:
Updated: 10/23/2014
Learning objective: Explain the basic of PHP programming
Click on image to enlarge.
This unit is intended to be a quick refresher of PHP from many of the concepts covered in CIS 141 Introduction to Programming. PHP skills or similar server side scripting are required for making a successful database connection which is at the heart of a modern Web 2.0 interactive Web sites.
Basic Syntax of PHP
Each PHP statement is terminated by semicolon (";"). The PHP markup can display text by using "echo" with variables named by dollar-prefix "$" on case-sensitive names ($xx, $xX, $NewX, etc.). The assignment operator is "=". The markup can be modularized into functions (or methods) defined with keyword "function" within optional classes named by "class xx". The control structures include: if, while, for, foreach, & switch. Grouping of text can be specified by curly braces ("{...}"), but some control structures can use colon syntax with end keywords, such as in statement if ($x==0) : echo "zero"; endif; <html> [Wikipedia]
The PHP processor only parses code within its delimiters. Anything outside its delimiters is sent directly to the output and not parsed by PHP. The most common open/close delimiters are "<?php" and "?>" so that a section of PHP markup appears within the set of angle-brackets "<?php.....?>" Other delimiters, in the form "<script language="php">" and "</script>", are also always available, so these two forms are the most portable. The first form of delimiters, <?php and ?>, in XHTML and other XML documents, creates correctly formed XML processing instructions. Therefore, in either of these two cases, the resulting mixture of PHP and other markup is well-formed, and so probably valid, as XML and XHTML on the server before PHP processing. This may be helpful if the source code documents ever need to be processed in other ways during the life of the software. [Wikipedia]
<?php                 // Opening PHP delimiter

print "Hello, world"; // End each statement with a ;

?>                    // Closing PHP delimiter
Variables and Comments in PHP
One of the language characteristic features is implicit variable declaration. Variables are prefixed with a dollar symbol and a type does not need to be specified in advance. Unlike function and class names, variable names are case-sensitive. Both double-quoted ("") and heredoc strings allow the ability to embed a variable's value into the string. PHP treats newlines as whitespace, in the manner of a free-form language (except when inside string quotes). Statements are terminated by a semicolon. PHP has three types of comment syntax: /* */ which serves as block comments, and // as well as # which are used for inline comments. Many examples use the print function instead of the echo function. Both functions are nearly identical; the major difference being that print is slower than echo because the former will return a status indicating if it was successful or not in addition to text to output, whereas the latter does not return a status and only returns the text for output. [Wikipedia]
<?php

// Set variable        // Single inline comment
$msg = "Hello, world"; // Variable start with $

/*
Print variable         // Multi-line block comment
*/
print $msg;

?>
PHP Operators
PHP has a rich set of operators for math, strings, and logic. Below is a Brief list and examples of common operators used in PHP. See list @ W3School
<?php

// 1) Assignment with modulus
$x = 5;
$y = $x % 3;
print "1) $x % 3 = $y";

// 2) Assignment operator for addition
$x = 5;
$x += 3;
print "2) $x += 3 = $x";

// 3) String concatenation
$x = "Hello, ";
$y = "world";
$z = $x . $y;
print "3) $x . $y = $z";

// 4) Assignment operator for concatenation
$x = "Hello, ";
$x .= "world";
print "4) $x .= $x = $x";

// 5) Increment by addition
$x = 1;
$x++;
$x++;
print "5) $x = 1 $x++ $x++ = $x";

// 6) Comparison operator for identical types and values
$x = "1";
$y = 1;
print "6) $x === $y = ";
var_dump($x === $y);
?>
PHP Conditional Statements
Conditionals in PHP are structured similarly to those found in C++ and Java. The structure begins with an if clause, which is composed of the word "if" followed by a true/false statement in parentheses ( ). The subsequent code will be contained in a block, denoted by curly braces { }. Sometimes the braces are omitted, and only one line will follow the if statement. elseif and else clauses sometimes occur after the if clause, to test for different statements. The if clause says "If this statement is true, I want the program to execute the following statements. If it is false, then ignore these statements." In technical terms, it works like this: When an if statement is encountered, the true/false statement in parentheses is evaluated. If the statement is found to be true, the subsequent block of code contained in curly braces is executed. However, if the statement is found to be false, the program skips those lines and executes the next non-blank line. Following the if clause are two optional clauses: else and elseif. The elseif (or else if) clause says "If the last statement was false, let's see if this statement is true. If it is, execute the following code. If it isn't, then skip it." elseif statements are only evaluated when the preceding if statement comes out to be false. Otherwise they are skipped. Other than that, the elseif clause works just like a regular if clause. If it is true, its block is executed, if not, its block is skipped. Finally, the else clause serves as a "catch-all" for an if statement. Essentially the else statement says "If all of the preceding tests fail, then execute this code." [Wikibooks]
<?php

$age = 22;

if($age < 13) {
  print "Kid";
} else if($age < 20) {
  print "Teen";
} else if($age < 30) {
  print "Young adult";
} else if($age < 50) {
  print "Middle aged";
} else {
  print "Over the hill!";
}

?>
PHP Loops
The for loop is one of the basic looping structures in most modern programming languages. Like the while loop, for loops execute a given code block until a certain condition is met. The basic syntax of the for loop in PHP is similar to the C syntax:
for([initialization]; [condition]; [step]) { work... }
Initialization happens the first time the loop is run. It is used to initialize variables or perform other actions that are to be performed before the first execution of the body of the loop. The Condition is evaluated before each execution of the body of the loop; if the condition is true, the body of the loop will be executed, if it is false, the loop is exited and program execution resumes at the first line after the body of the loop. Step specifies an action that is to be performed after each execution of the loop body. [Wikibooks]
<?php

$max = 12; // Size of the table

$row = 1;                         // Seed row at 1
while($row <= $max) {             // Size of the table
  $col = 1;
  while($col <= $max) {           // Number of columns

    $tot = $row * $col;           // Sum the row and col
    if($tot < 10)  { print " "; } // Add spaces for formatting
    if($tot < 100) { print " "; }

    print "<div style='float: left; width: 3em; text-align: right;'> $tot</div>";

    $col++;                       // Add 1 to col

  }
  print "<p style='clear:both'></p>\n";  // Start new line
  $row++;
}

?>
The while loop is often used when extracting records form a database query in the results table. The while loop will continue until a test is met such as end of data. This will be cover in future units. The example below is a while solution to the for table example above. Note the seeding and incrementing of the variables $row and $col.
<?php

$max = 12; // Size of the table

$row = 1;                         // Seed row at 1
while($row <= $max) {             // Size of the table
  $col = 1;
  while($col <= $max) {           // Number of columns

    $tot = $row * $col;           // Sum the row and col
    if($tot < 10)  { print " "; } // Add spaces for formatting
    if($tot < 100) { print " "; }
    print " $tot";
    $col++;                       // Add 1 to col

  }
  print "\n";                     // Start new line
  $row++;
}

?>
Thinking: How different is PHP from JavaScript?
Key terms: conditional, delimiter, loop, operators, syntax, variable
Resources:
To maximize your learning, please visit these Web sites and review their content
to help reinforce the concepts presented in this section.
Quick links:
PHP Syntax and Semantics @ Wikipedia
PHP Operators @ W3Schools
PHP Programming if structure @ Wikibooks
PHP Programming for loop @ Wikibooks
Notes on navigation: Click inside the frame to navigate the embedded Web page. - Click outside the frame to navigate this page to scroll up/down between the embedded Web pages. - Click on the frame title to open that page in a new tab in most browsers. - Click on the the "Reload page" link to reload the original page for that frame.
PHP Syntax and Semantics @ Wikipedia |
Reload page
PHP Operators @ W3Schools |
Reload page
PHP Programming if structure @ Wikibooks |
Reload page
PHP Programming for loop @ Wikibooks |
Reload page
Notes:
Learning objective: Explain the difference between GET and POST

Click on image to enlarge.
HTTP
An HTTP session is a sequence of network request-response transactions. An HTTP client initiates a request by establishing a Transmission Control Protocol (TCP) connection to a particular port on a server (typically port 80, occasionally port 8080; see List of TCP and UDP port numbers). An HTTP server listening on that port waits for a client's request message. Upon receiving the request, the server sends back a status line, such as "HTTP/1.1 200 OK", and a message of its own. The body of this message is typically the requested resource, although an error message or other information may also be returned. [Wikipedia]
GET Method
Web/Html forms are a process which allows users/viewers to Enter information on a web page which will then be sent to the web server for processing. The most common method for processing is called CGI ( Common Gateway Interface ) and this stipulates how the data will be passed to an external ( from the web server) program and how that program will generate web page to be displayed back to the user. The HTML form can specify one of two methods for data to be sent from the Web server, the first is GET which specifies that all information is included in the requested URL. The second is POST which specifies that additional information will be sent after the URL request. While there are advantages of both the biggest advantage of GET is that since everything is in the URL the input (and resulting display) can be bookmarked or saved in a link so that the data doesn't need to be re-entered each time. [Wikibooks]
http://www.google.com/search?q=Olympic+College
GET arguments are the simplest means of querying a dynamic web page for specific information. They consist of a simple modification to the base URL, beginning with a "?" sign after the filename. Not all websites provide GET argument interfaces as part of their information portal, but many do. Everything after the "?" is the GET argument, which tells the Google server what you are interested in. If you are unfamiliar with this, try experimenting by changing the text after the "q=" in the above URL. [Wikibooks]
<form method="get" action="pizza-get.php"> // GET for form method
Name: <input type="text" name="name" size="10" />
<br />
Size:
<input type="radio" name="size" value="small" />Small
<input type="radio" name="size" value="medium" checked="" />Medium
<input type="radio" name="size" value="large" />Large
<br />
Topping:
<input type="checkbox" name="pepp" />Pepperoni
<input type="checkbox" name="mush" />Mushrooms
<input type="checkbox" name="gppr" />Grn peppers
<br />
<input type="submit" value="Order Pizza!" />
</form>
If the user submits "Bob" for the name with a medium pizza with pepperoni and mushrooms, the following would be sent to the sever with the GET method showing the form data in the URL. A benefit of the GET method is that it can be booked marked for future references. Note the ? separating the processor from the data and the & separating the form name from the data sent.
pizza.php?name=Bob&size=md&pep=on&msh=on
POST Method
In computing, POST is one of many request methods supported by the HTTP protocol used by the World Wide Web. The POST request method is designed to request that a web server accept the data enclosed in the request message's body for storage. It is often used when uploading a file or submitting a completed web form. In contrast, the HTTP GET request method is designed to retrieve information from the server. As part of a GET request, some data can be passed within the URI's query string, specifying for example search terms, date ranges, or other information that defines the query. As part of a POST request, an arbitrary amount of data of any type can be sent to the server in a request message body. A header field in the POST request usually indicates the message body's Internet media type. [Wikipedia]
<form method="post" action="pizza-post.php"> // POST for form method
Name: <input type="text" name="name" size="10" />
<br />
Size:
<input type="radio" name="size" value="small" />Small
<input type="radio" name="size" value="medium" checked="" />Medium
<input type="radio" name="size" value="large" />Large
<br />
Topping:
<input type="checkbox" name="pepp" />Pepperoni
<input type="checkbox" name="mush" />Mushrooms
<input type="checkbox" name="gppr" />Grn peppers
<br />
<input type="submit" value="Order Pizza!" />
</form>
If the user submits "Bob" for the name with a medium pizza with pepperoni and mushrooms, the following would be sent to the sever with the POST method that does not expose the form data in the URL. The form data is encoded similar to the GET method but is passed at the packet level. Note that the data is sent as plain text easily observable over a network with tools like Wireshark.
pizza.php and encoding data as "name=Bob&size=md&pep=on&msh=on"
HTTPS
Hypertext Transfer Protocol Secure (HTTPS) is a communications protocol for secure communication over a computer network, with especially wide deployment on the Internet. Technically, it is not a protocol in and of itself; rather, it is the result of simply layering the Hypertext Transfer Protocol (HTTP) on top of the SSL/TLS protocol, thus adding the security capabilities of SSL/TLS to standard HTTP communications. The main motivation for HTTPS is to prevent wiretapping and man-in-the-middle attacks.
In its popular deployment on the internet, HTTPS provides authentication of the website and associated web server that one is communicating with, which protects against man-in-the-middle attacks. Additionally, it provides bidirectional encryption of communications between a client and server, which protects against eavesdropping and tampering with and/or forging the contents of the communication. In practice, this provides a reasonable guarantee that one is communicating with precisely the website that one intended to communicate with (as opposed to an impostor), as well as ensuring that the contents of communications between the user and site cannot be read or forged by any third party. HTTPS URLs begin with "https://" and use port 443 by default, whereas HTTP URLs begin with "http://" and use port 80 by default. [Wikipedia]
Thinking: When should you use HTTPS and why?
Key terms: GET, HTTP, HTTPS, POST, form, port
Resources:
To maximize your learning, please visit these Web sites and review their content
to help reinforce the concepts presented in this section.
Quick links:
Hypertext Transfer Protocol @ Wikipedia
HTTP Methods: GET vs. POST @ W3Schools
GET @ Wikibooks
POST (HTTP) @ Wikipedia
HTTP Secure @ Wikipedia
HTML Forms and Input @ W3Schools
Notes on navigation: Click inside the frame to navigate the embedded Web page. - Click outside the frame to navigate this page to scroll up/down between the embedded Web pages. - Click on the frame title to open that page in a new tab in most browsers. - Click on the the "Reload page" link to reload the original page for that frame.
Hypertext Transfer Protocol @ Wikipedia |
Reload page
HTTP Methods: GET vs. POST @ W3Schools |
Reload page
POST (HTTP) @ Wikipedia |
Reload page
HTTP Secure @ Wikipedia |
Reload page
HTML Forms and Input @ W3Schools |
Reload page
Notes:
Learning objective: Explain how the client-server model works

Click on image to enlarge.
The client–server model of computing is a distributed application structure that partitions tasks or workloads between the providers of a resource or service, called servers, and service requesters, called clients. Often clients and servers communicate over a computer network on separate hardware, but both client and server may reside in the same system. A server host runs one or more server programs which share their resources with clients. A client does not share any of its resources, but requests a server's content or service function. Clients therefore initiate communication sessions with servers which await incoming requests. Examples of computer applications that use the client–server model are Email, network printing, and the World Wide Web. [Wikipedia]
Client and Server Communication
In general, a service is an abstraction of computer resources and a client does not have to be concerned with how the server performs while fulfilling the request and delivering the response. The client only has to understand the response based on the well-known application protocol, i.e. the content and the formatting of the data for the requested service. Clients and servers exchange messages in a request-response messaging pattern: The client sends a request, and the server returns a response. This exchange of messages is an example of inter-process communication. To communicate, the computers must have a common language, and they must follow rules so that both the client and the server know what to expect. The language and rules of communication are defined in a communications protocol. All client-server protocols operate in the application layer. The application-layer protocol defines the basic patterns of the dialogue. To formalize the data exchange even further, the server may implement an API (such as a web service). The API is an abstraction layer for such resources as databases and custom software. By restricting communication to a specific content format, it facilitates parsing. By abstracting access, it facilitates cross-platform data exchange. [Wikipedia]
isset() Function in PHP
The key concept in a client / sever relationship is the transition of data between the client and the server. In PHP, that is done with the $_GET["var"] and $_POST["var"] variables. The data from the form is passed as a group called an associative array. Each element of the array is identified by a name instead of a index value. When the request for processing is received by the sever, the data is not yet associated with the code for processing. The $_GET["var"] and $_POST["var"] variables allow the data to be passed from the server into the program to be assigned to local variables. The isset() function tests to see if there is data to be passed from the server. If no data is present, a preassigned value can be set in case there is no data. In the example below, an empty sting is assigned to $name. If data was present in $_GET["name"], the data would be assigned to the local $name variable. If the isset() function was not used, the local data might be set to null or some other value not useable to the code and may cause to to fail. Some sever environments may require the use of isset() to deal with these issues.
if(isset($_GET["name"])) { $name = $_GET["name"]; } else { $name = ""; }
$_GET["var"] Variable in PHP
The pizza code below show how the $_GET["var"] variable is used to acquire data from the from set as a GET method and received by the server to then be assigned to a local variable inside the code in a PHP program. When the from is sent, multiple types of data are packaged into an associative array. The size of the pizza is sent as a radio button, thus only one value is passed. The toppings are sent as checkboxes and if a selection is made, a value of like "on" is sent to the server. If no selection is made, a null is sent. The the isset() is needed to convert the null into an empty string. Note each topping requires its own variable and tests since there may be more then one option selected.
<?php

// Get pizza data sent by GET
// isset() tests for data at the gateway, required on many servers
if(isset($_GET["name"])) { $name = $_GET["name"]; } else { $name = ""; }
if(isset($_GET["size"])) { $size = $_GET["size"]; } else { $size = ""; }
if(isset($_GET["pepp"])) { $pepp = $_GET["pepp"]; } else { $pepp = ""; }
if(isset($_GET["mush"])) { $mush = $_GET["mush"]; } else { $mush = ""; }
if(isset($_GET["gppr"])) { $gppr = $_GET["gppr"]; } else { $gppr = ""; }

print "
<style>
body { margin: 4%; }
</style>

<body>
<h1>Pizza Order for $name</h1>
<p><b>Size:</b> $size<br /><br /><b>Toppings:</b>
";

// Print topping if checked
if($pepp) { print "pepperoni "; }
if($mush) { print "mushrooms "; }
if($gppr) { print "grn-pepper "; }

print "
</p>
</body>
";

?>
Note that when the form is executed, the results will be in HTML, not PHP. The PHP code above returns HTML.
$_POST["var"] Variable in PHP
The pizza code below show how the $_POST["var"] variable is used to acquire data from the from set as a POST method and received by the server to then be assigned to a local variable insie the code in a PHP program. When the from is sent, multiple types of data are packaged into an associative array. The size of the pizza is sent as a radio button, thus only one value is passed. The toppings are sent as checkboxes and if a selection is made, a value of like "on" is sent to the server. If no selection is made, a null is sent. The the isset() is needed to convert the null into an empty string. Note each topping requires its own variable and tests since there may be more then one option selected.
<?php

// Get pizza data sent by POST
// isset() tests for data at the gateway, required on many servers
if(isset($_POST["name"])) { $name = $_POST["name"]; } else { $name = ""; }
if(isset($_POST["size"])) { $size = $_POST["size"]; } else { $size = ""; }
if(isset($_POST["pepp"])) { $pepp = $_POST["pepp"]; } else { $pepp = ""; }
if(isset($_POST["mush"])) { $mush = $_POST["mush"]; } else { $mush = ""; }
if(isset($_POST["gppr"])) { $gppr = $_POST["gppr"]; } else { $gppr = ""; }

print "
<style>
body { margin: 4%; }
</style>

<body>
<h1>Pizza Order for $name</h1>
<p><b>Size:</b> $size<br /><br /><b>Toppings:</b>
";

// Print topping if checked
if($pepp) { print "pepperoni "; }
if($mush) { print "mushrooms "; }
if($gppr) { print "grn-pepper "; }

print "
</p>
</body>
";

?>
Note that when the form is executed, the results will be in HTML, not PHP. The PHP code above returns HTML.
Thinking: When is GET better then POST?
Key terms: $_GET["var"], $_POST["var"], client, from, isset(), local variable, server
Resources:
To maximize your learning, please visit these Web sites and review their content
to help reinforce the concepts presented in this section.
Quick links:
Client-server Model @ Wikipedia
PHP and MySQL Programming/Form Handling @ Wikibooks
PHP 5 Form Handling @ W3Schools
Notes on navigation: Click inside the frame to navigate the embedded Web page. - Click outside the frame to navigate this page to scroll up/down between the embedded Web pages. - Click on the frame title to open that page in a new tab in most browsers. - Click on the the "Reload page" link to reload the original page for that frame.
Client-server Model @ Wikipedia |
Reload page
PHP and MySQL Programming/Form Handling @ Wikibooks |
Reload page
PHP 5 Form Handling @ W3Schools |
Reload page
Notes:
Learning objective: Explain the basic steps to allow a database to interact with a program
Click on image to enlarge.
PHP / MySQL Example
This section will focus on a PHP / MySQL connection for it working example of interfacing a database connection as part of creating an interactive Web page. This unit will not focus on how to create a database but basics of how to connect, execute a simple query in SQL, and process the results table. The example below demonstrates how a SQL query is executed and a results table is returned and turned into a Web page. A details explanation of this code is listed below the code.
<style>
td { border: 1px solid black; padding: 5px; }
</style>

<?php

// 1) Make connection to the MySQL server
mysql_connect("localhost","user","password");

// 2) Select database
mysql_select_db("statebirds");

// 3) Create SQL statement to select data from database
// $sql = "SELECT * FROM birds";
// $sql = "SELECT * FROM birds WHERE bird = 'Robin' ";
   $sql = "SELECT * FROM birds WHERE state LIKE 'New%' ";

// Print title
print "<h3>$sql</h3>";

// 4) Execute query for results table
$results = mysql_query($sql);

// 5) Walk through the results table to extract the data
print "<table>";
while($row = mysql_fetch_array($results)) {

  print "<tr>";
  print "<td>" . $row["state"] . "</td>";
  print "<td>" . $row["bird"] . "</td>";
  print "</tr>";

}
print "</table>";

// 6) Close connection to database when code complete
mysql_close();

?>
mysql_connect() Function
mysql_connect("localhost","user","password");
Step 1: Connect to the SQL server
The mysql_connect() opens the connection between the PHP environment and the SQL server. Since the SQL server is a secure server, credentials need to be passed. The first argument in the mysql_connect() is the location of the SQL server you are trying to access and then the credentials to access the server. The database is managed by the database administrator and they will be needed to setup a database on the server and provide you with credentials. BTW: The average database administrator salary is around $70k a year.
mysql_select_db() Function
mysql_select_db("statebirds");
Step 2: Connect to the database
Once a successful connection has been made to the database server, the database you plan to use needs to be selected from the many possibly databases available at the server. The database is usually developed and managed by the database administrator.
SQL Statement
// $sql = "SELECT * FROM birds";
// $sql = "SELECT * FROM birds WHERE bird = 'Robin' ";
   $sql = "SELECT * FROM birds WHERE state LIKE 'New%' ";
Step 3: Create a SQL statement
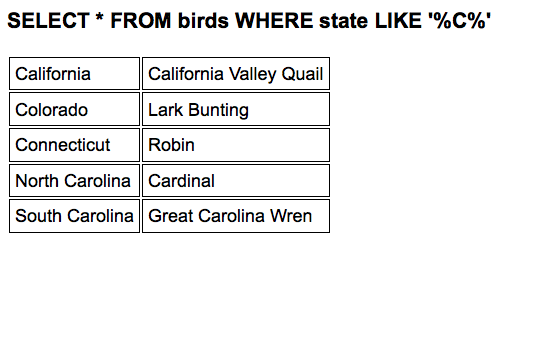
Once a connection to the database has been made, a SQL statement will need to be developed to extract the data from the database based on a given search criteria. SQL statements can be simple, like ones in this example or *very* complex. That is why most colleges offer one or more classes in SQL to assist with understanding the complexities of developing a good SQL statement that meets the needs of the user. In its basic form, the SELECT statement selects what fields will be retrieved from the database. The "*" asterisk retrieves all fields associated with the tables involved. The FROM identifies the the table(s) that the data will be retrieved from. The WHERE clause gives a condition that the data needs to match for retrieval of a given record. Since the first example given "SELECT * FROM birds" has no WHERE clause, all records in the table are returned. The "LIKE 'New%'" searches for states that start with "New" and returns only records that match that pattern like "New York" or "North Dakota".
SQL or Structured Query Language is a special-purpose programming language designed for managing data held in a relational database management system (RDBMS). [Wikipedia] SQL is a descriptive language, not a procedural one. It does not pre-decide all aspects of the relational operations (which operation, their order, ...) which are generated from the given SQL statement. The rDBMS has the freedom to generate more than one execution plan from a statement. It compares the generated execution plans with each other and runs the one it thinks is best in the given situation. Additionally the end user is freed from all the gory details of data access, e.g.: Which one of a set of WHERE criteria should be evaluated first if they are combined with AND? [Wikibooks]
mysql_query() Function
$result = mysql_query($sql);
Step 4: Execute the SQL statement
Once the SQL statement has been prepared from the previous step, the mysql_query() will execute the SQL statement against the database which is another server environment with its own complexities. The results of the query will be returned as an associative array commonly referred to as the "results table." The results table is basically a mini version of the table being queried with rows and columns being selected by the SQL statement. In this example, the results table is assigned to "$results" as an associative array for later processing.
mysql_fetch_array() Function
print "<table>";
while($row = mysql_fetch_array($results)) { // Walk through the results table

  print "<tr>";
  print "<td>" . $row["state"] . "</td>";  // Print data from results table
  print "<td>" . $row["bird"] . "</td>";
  print "</tr>";

}
print "</table>";
Step 5: Process the results
Once the results are available from the SQL event, they are held in an associative array like "$results" in this example. They can be unpacked using the while() loop and mysql_fetch_array() into the program like variables. The while() loop walks through all the available rows being retuned in the results table starting at row one. The mysql_fetch_array() returns each row of the results table into a simple associative array where giving the name of the field can extract the data from the array where it can be use or stored into a local variable for later use. In this example, $row["state"] will give the name of the current state on the current row in the associate array being processed. Note the integration of HTML and JavaScript to create the output and the CSS to assist with presentation.
mysql_close() Function
mysql_close();
Step 6: Disconnect from the SQL server
The mysql_close() closes the connection between the PHP environment and the SQL server. Since the SQL server is a secure server, it is important to formally disconnect from the SQL server to let the SQL server know to release resources used to maintain the connection.
Thinking: Why use a database?
Key terms: SQL, associative array, connection, database, field, results table, row
Resources:
To maximize your learning, please visit these Web sites and review their content
to help reinforce the concepts presented in this section.
Quick links:
MySQL Functions @ PHP
SQL @ Wikipedia
Structured Query Language/SQL: A Language for Working with rDBMS @ Wikibooks
SQL Tutorial @ W3Schools
Notes on navigation: Click inside the frame to navigate the embedded Web page. - Click outside the frame to navigate this page to scroll up/down between the embedded Web pages. - Click on the frame title to open that page in a new tab in most browsers. - Click on the the "Reload page" link to reload the original page for that frame.
MySQL Functions @ PHP |
Reload page
Structured Query Language/SQL: A Language for Working with rDBMS @ Wikibooks |
Reload page
SQL Tutorial @ W3Schools |
Reload page
Notes: